In this article, we will explore various methods to mask objects using the Material Editor in Unreal Engine 5 (UE5).
Masking is a powerful technique that allows developers to hide or reveal certain parts of an object or scene, and can be used for a variety of purposes, such as creating special effects, hiding invisible collision meshes, or creating more detailed and realistic environments.
Whether you are a beginner or an experienced developer, this article will provide you with the knowledge and tools you need to mask objects in UE5 like a pro.
Simple Masking On A Single Axis
The simplest way and setup is to mask the portion of the object that crosses a certain threshold in any of the three axis X,Y,Z.
For this tutorial, Let’s assume we want to make some part of the mesh invisible when it crosses our Z threshold. Eg Any part of the mesh that’s lower than 20 Units in World Space should be invisible or masked out.
In this scenario, Z is our axis, and 20 is the threshold. Anything above 20 in world space will be visible.
Creating The Material
Most of the work will be done by the material that will be applied to the Mesh we want to mask. For this to work, we must set our material Blend Mode to “Masked”. This is so that we can get access to the “Opacity Mask” output.
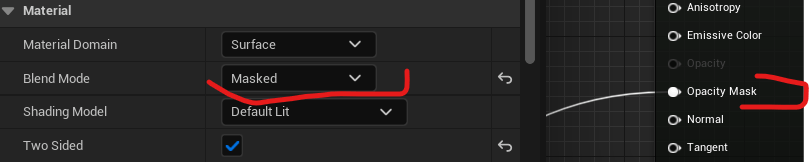
The Opacity Mask
The “Opacity Mask” is a feature in the Material Editor of Unreal Engine 5 (UE5) that allows developers to mask specific parts of an object by controlling its transparency. This is achieved by submitting a value of 0.0 or 1.0 where 0 represents fully transparent areas and 1.0 represents fully opaque (visbible) areas.
NB: Keep in mind we are working in per pixel terms (of the material), meaning we can set a different value per pixel depending on the math we do before submitting the value.
The Absolute World Position Node
The “Absolute World Position” node in the Material Editor of Unreal Engine 5 (UE5) is a node that outputs the absolute world position of a pixel on a mesh in the scene. This means we can check if the pixel is below 20 Z units in world space. If it’s below 20 Z-Unitz we set it to invisible by setting the opacity mask value to 0. Simple right?
To do this “IF x, then y” comparison we need to use the Material Editor “IF” node. This “If” node outputs a different value, 0 or 1 in our case , depending on the Z axis of the pixel.
NB: To get the Z-axis value of the pixel, we can use the Component Mask node.
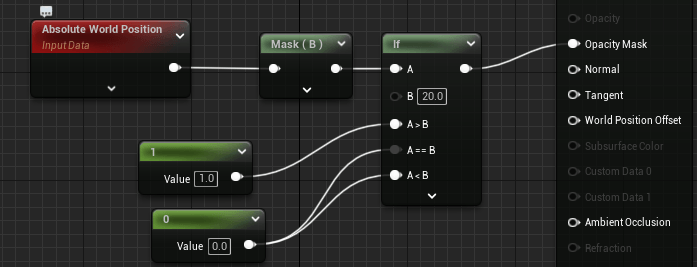
It’s important to remember the B value or “20” in this case can be set by blueprints by changing it into a parameter that can be set by using Dynamic Material Instances.
This means you can have an arbitrary Z value threshold that can be set by game events/ procedurally.
Setting Mask Point from Blueprints
This section is optional. From step 1 above, if you apply your material to a mesh and it goes under 20 z units, it will be masked. The following is just a suggestion on how to control this cutoff or threshold point from Blueprints.
Material Parameter Collection vs Normal Parameters
Material Parameter Collection allows you to group and control multiple parameters as a single unit, and it can be shared among multiple materials, which can be very useful for situations where multiple materials need to share the same parameter value. While Normal Parameters are specific to a single material and can be used to control various aspects of the material.
Whatever approach you choose does not matter, just make sure you reference the parameter in the material and in the blueprint. You can then set this paramater on begin play or on tick depending on your project’s demands.
Opacity Mask With Rotation
Sometimes you wish to take the Rotation of objects into consideration when masking. The simplest way to do this is to use the Forward Vector of an Actor/Object. You then just check if Absolute World Position is in front or behind the object/acotor by use of the Dot product.
Check If Absolute World Position is in front or behind The Objects Forward Vector.
Keep in mind you can pass in the Forward Vector Position and Actor Position from Blueprints to the Material Editor through the use of Material Parameters.
To check if the absolute world position is behind or in front of the forward vector, you can calculate the dot product between the forward vector and the vector pointing from the object’s position to the absolute world position. The dot product will give you a scalar value that represents the angle between the two vectors.
Here’s the general idea:
Calculate the vector pointing from the object’s position to the pixel world position. You can do this by subtracting the object’s position from the point’s position.
Normalize both the forward vector and the vector pointing from the object’s position to the point.
Calculate the dot product between the two normalized vectors.
If the dot product is positive, it means the point is in front of the object. If the dot product is negative, it means the point is behind the object. If the dot product is zero, it means the point is perpendicular to the forward vector.
You can then add either an IF node or custom node that returns either 1 or 0 (the mask) depending on if the Dot Product is positive or negative. Plug the result of this if condition into the Opacity Mask.
Opacity Mask Using Box Mask 3D
The Material Editor has a Box Mask 3D Node. You can use this to drive a mask. The concept is simple.
We have a point/position, and we draw a 3D BOX in World Space. We then check if this point is within this 3D Box. If it is in, the BOX Mask 3D node will return 1.0 or true, if not, it will return 0.
Simple right? This means we can check if our Absolute World Position is in this area and then chose if we want to make it or not.
The box mask 3d node has the following inputs: A,B ,Bounds and falloff.
The box mask 3d node has the following inputs: A,B ,Bounds and falloff.
The “A” is the position you want to check/verify if it’s within the box.
“B” is the origin or start position of the box.
“Bounds“, is the size of the box. I.e we start from B and apply the size and we have a box.
Falloff is like a border radius for the box, you can soften the edges of the box.
You’ll usually witness developers doing a 1-minus from the result of the Box Mask 3D. This simply inverting the result. That is, convert trues to false and false to true. Depends on your use case of the box mask result. You can even replace it with an IF node or a custom node with If conditions that return a specific result.